Thursday, 9 July 2020

KARATE (API TESTING) BASICS

KARATE API Testing Basics:

Karate , I started with Intellij IDE . I added the required dependencies in Maven. I started creating a new Maven Project and click on Add Archetypes. I have given below information in the small popup

Archetype Group Id= com.intuit.karate
ArchetypeArtifactId= karate-archetype
ArchetypeVersion=0.2.7

Then I entered my project name and its created my first project. Then in the project explorer, i started creating my directory structure. In Karate directory structure becomes so important since we are going to deal with .feature files, and a java runner class and request and response Json files. So we need to arrange them in  a particular fashion so that the IDE picks it up from right location.

Before that , lets have a look at the Maven dependencies . Karate needs an integration with Junit to run the test cases. so we need to add / or make sure these dependencies are in place.

<dependencies>
<dependency>
<groupId>com.intuit.karate</groupId>
<artifactId>karate-apache</artifactId>
<version>${karate.version}</version>
<scope>test</scope>
</dependency>
<dependency>
<groupId>com.intuit.karate</groupId>
<artifactId>karate-junit4</artifactId>
<version>${karate.version}</version>
<scope>test</scope>
</dependency>
</dependencies>


Here karate.version may be the current version of karate. The current version we can check it from Maven repository (https://mvnrepository.com/artifact/com.intuit.karate/karate-junit5)

At this point of time, the current stable version is 0.9.5 , that I updated into my maven dependencies like below
<dependency>
<groupId>com.intuit.karate</groupId>
<artifactId>karate-junit4</artifactId>
<version>0.9.5</version>
<scope>test</scope>
</dependency>

Now is the time to create folder structure:
Expand the project folders, expand src, and then Java. Now right click java and select new and package. Enter the name of the package
then in the package you can create sub folders requests, responses, if required features as a separate folder. 


Thursday, 13 December 2018

Fetching more than 100 Rows from JIRA in PowerBI

Fetching more than 100 Rows from JIRA in PowerBI

When you integrate JIRA and Power BI, you can use the JIRA content pack to configure the JIRA URL and authentication details. Please find the JIRA Content Pack attached with this page. Once you configured the JIRA content pack, its only able to retrieve first 100 issues / stories from JIRA. To fetch all records, you need to open the Power BI desktop . There go to Edit Queries which will be opened in a new Window. Then click on Advanced Editor and change this line value from 500 to 100. Thats it.

let
    Source = FetchPages("", 100),

Thursday, 5 July 2018

How to create a web Plugin to change TLS settings in VSTS Load Testing

Web performance tests plug-ins enable you to isolate and reuse code outside the main declarative statements in your Web performance test. A customized Web performance test plug-in offers you a way to call some code as the Web performance test is run. The Web performance test plug-in is run one time for every test iteration. In addition, if you override the PreRequest or PostRequest methods in the test plug-in, those request plug-ins will run before or after each request, respectively.
You can create a customized Web performance test plug-in by deriving your own class from the WebTestPlugin base class.
You can use customized Web performance test plug-ins with the Web performance tests you have recorded, which enables you to write a minimal amount of code to obtain a greater level of control over your Web performance tests. However, you can also use them with coded Web performance tests. For more information, see How to: Create a Coded Web Performance Test.
System_CAPS_ICON_note.jpg Note
You can also create load test plug-ins. See How to: Create a Load Test Plug-In.
Requirements
  • Visual Studio Enterprise

To create a custom Web performance test plug-in

  1. Open a Web performance and load test project that contains a Web performance test.
    For more information about how to create a Web performance and load test project, see How to: Create and Configure Test Projects for Automated Tests.
  2. In Solution Explorer, right-click on the solution and select Add and then choose New Project.
    The Add New Project dialog box is displayed.
  3. Under Installed Templates, select Visual C#.
  4. In the list of templates, select Class Library.
  5. In the Name text box, type a name for your class.
  6. Choose OK.
  7. The new class library project is added to Solution Explorer and the new class appears in the Code Editor.
  8. In Solution Explorer, right-click the References folder in the new class library and select Add Reference.
  9. The Add Reference dialog box is displayed.
  10. Choose the .NET tab, scroll down, and select Microsoft.VisualStudio.QualityTools.WebTestFramework
  11. Choose OK.
    The reference to Microsoft.VisualStudio.QualityTools.WebTestFramework is added to the Reference folder in Solution Explorer.
  12. In Solution Explorer, right-click on the top node of the Web performance and load test project that contains the load test to which you want to add the Web performance test plug-in and select Add Reference.
  13. The Add Reference dialog box is displayed.
  14. Choose the Projects tab and select the Class Library Project.
  15. Choose OK.
  16. In the Code Editor, write the code of your plug-in. First, create a new public class that derives from WebTestPlugin.
  17. Implement code inside one or more of the event handlers. See the following Example section for a sample implementation.
  18. After you have written the code, build the new project.
  19. Open a Web performance test.
  20. To add the Web performance test plug-in, choose Add Web Test Plug-in on the toolbar.
    The Add Web Test Plug-in dialog box is displayed.
  21. Under Select a plug-in, select your Web performance test plug-in class.
  22. In the Properties for selected plug-in pane, set the initial values for the plug-in to use at run time.
    System_CAPS_ICON_note.jpg Note
    You can expose as many properties as you want from your plug-ins; just make them public, settable, and of a base type such as Integer, Boolean, or String. You can also change the Web performance test plug-in properties later by using the Properties window.
  23. Choose OK.
    The plug-in is added to the Web Test Plug-ins folder.

    code for changing the TLS Settings:

    using System;
    using System.Collections.Generic;
    using System.Linq;
    using System.Text;
    using System.Threading.Tasks;
    using Microsoft.VisualStudio.TestTools.WebTesting.Rules;
    using Microsoft.VisualStudio.TestTools.WebTesting;
    using System.ComponentModel;
    using System.Net;
    using System.Net.Security;
    using System.Security.Cryptography.X509Certificates;

    namespace ChgSSL
    {

        public class Tls12ForcedPlugin : WebTestPlugin
        {
            [Description("Enable or Disable the plugin functionality")]
            [DefaultValue(true)]
            public bool Enabled { get; set; }

            public override void PreWebTest(object sender, PreWebTestEventArgs e)
            {
                base.PreWebTest(sender, e);

                ServicePointManager.SecurityProtocol = SecurityProtocolType.Tls12;

                ServicePointManager.ServerCertificateValidationCallback = RemoteCertificateValidationCB;


                e.WebTest.AddCommentToResult(this.ToString() + " has made the following modification-> ServicePointManager.SecurityProtocol set to use Tlsv12 in WebTest Plugin.");
            }
            public static bool RemoteCertificateValidationCB(Object sender, X509Certificate certificate, X509Chain chain, SslPolicyErrors sslPolicyErrors)
            {
                //If it is really important, validate the certificate issuer here.
                //this will accept any certificate
                return true;
            }
        }
    }

Tuesday, 29 May 2018

Downloading File /Files to a remote machine using Powershell

During a desktop application performance testing scenario, I came up with a challenge to move three dll files to 300+ AWS workspaces. I calculated even if I took 5 mins per one workspace, it would cost be 1500 Mins that is 25Hrs. So atleast I need three people do this task in a day or I have to do this in three days or less. So thought of using Powershell to do this job. I wrote my script with the help of google and unable to run it due to some exception.

Here is the script:
param([switch]$Elevated)

function Test-Admin {
  $currentUser = New-Object Security.Principal.WindowsPrincipal $([Security.Principal.WindowsIdentity]::GetCurrent())
  $currentUser.IsInRole([Security.Principal.WindowsBuiltinRole]::Administrator)
}

if ((Test-Admin) -eq $false)  {
    if ($elevated)
    {
        # tried to elevate, did not work, aborting
    }
    else {
        Start-Process powershell.exe -Verb RunAs -ArgumentList ('-noprofile -noexit -file "{0}" -elevated' -f ($myinvocation.MyCommand.Definition))
}

exit
}
$Files =Import-Csv D:\Test.csv
import-Module bitstransfer
ForEach($File in $Files)
 {
        $ip=$File.ip
        Write-Output $ip
        $Uname =$File.Uname
        Write-Output $Uname
        $Pwd = $File.Pwd
        $Source ="D:\DLL Files\*.dll"
        $Dest = "\\$($ip)\c$\Program Files (x86)\NetSuite\NetSuite Point of Sale\"
        Write-Output $Dest
        $secpasswd = ConvertTo-SecureString "shoN$p0s" -AsPlainText -Force
        $cred = New-Object System.Management.Automation.PSCredential ($Uname, $secpasswd)
        Write-Output $cred
        $Session = New-PSSession -ComputerName $ip -Credential $cred
        $File = [System.IO.File]::ReadAllBytes("D:\DLL_Files\oAuthRestletCall.dll");
        $File1 = [System.IO.File]::ReadAllBytes("D:\DLL_Files\HtmlAgilityPack.dll");
        $File2 = [System.IO.File]::ReadAllBytes("D:\DLL_Files\MPK_Calendar.dll");
        Invoke-Command -Session $session -ArgumentList $file -ScriptBlock{[System.IO.File]::WriteAllBytes("C:\Program Files (x86)\NetSuite\NetSuite Point of Sale\oAuthRestletCall.dll", $args)};
        Invoke-Command -Session $session -ArgumentList $file1 -ScriptBlock{[System.IO.File]::WriteAllBytes("C:\Program Files (x86)\NetSuite\NetSuite Point of Sale\HtmlAgilityPack.dll", $args)};
        Invoke-Command -Session $session -ArgumentList $file2 -ScriptBlock{[System.IO.File]::WriteAllBytes("C:\Program Files (x86)\NetSuite\NetSuite Point of Sale\MPK_Calendar.dll", $args)};
        #Copy-Item $Source $Dest -Recurse -Force
        #Start-BitsTransfer -Source $Source -Destination $Dest -Credential $cred
        Write_Output "done"
        Remove-PSSession $Session
        }     

Then I took the approach of doing this task with SIKULI + Powershell IDE and succeeded. I spent an hour by StackOverflow and other sites and here is the code :

PS C:\Windows\system32\WindowsPowerShell\v1.0>
[10.9.8.238]: PS D:\Users\PerfReg1172\Documents> $url = "http://10.9.11.192/Logs/NTWSLogs/HtmlAgilityPack.dll";
$output = "c:\Program Files (x86)\NetSuite\NetSuite Point of Sale\HtmlAgilityPack.dll";
Invoke-WebRequest -Uri $url -OutFile $output;
$url = "http://10.9.11.192/Logs/NTWSLogs/MPK_Calendar.dll";
$output = "c:\Program Files (x86)\NetSuite\NetSuite Point of Sale\MPK_Calendar.dll";
Invoke-WebRequest -Uri $url -OutFile $output;
$url = "http://10.9.11.192/Logs/NTWSLogs/oAuthRestletCall.dll";
$output = "c:\Program Files (x86)\NetSuite\NetSuite Point of Sale\oAuthRestletCall.dll";
Invoke-WebRequest -Uri $url -OutFile $output;

I already have an IIS running and copied the files to a directory.I declared this variables to store the file contents in  a variable and writing them as a file in the remote machine.SIKULI will open a new remote Power Shell session in Powershell IDE, then it will paste the above lines and execute them. I made a loop with all 300 machine ip's and passwords to achieve this.

Thank you SIKULI + POWERSHELL.

I did it by 9 Hrs where sikuli ran unattended.  I wasted nerely 5 hours in the task1 .

Attaching a SQL Server Database to DB server through T-SQL

While working to develop a SIKULI script to run on multiple machines, i came to a situation  to attach a database in every machine. As sikuli is not much flexible, i choose to attach the db via T-SQL .

I opened the SQL server  management studio in the remote machine and logged into that with SIKULI script. so finally find the below code to be run on a new query window.

CREATE DATABASE RAPOS_Replication  
    ON (FILENAME = 'C:\Program Files\Microsoft SQL Server\MSSQL10_50.MSSQLSERVER\MSSQL\DATA\RAPOS_Replication.mdf'),  
    (FILENAME = 'C:\Program Files\Microsoft SQL Server\MSSQL10_50.MSSQLSERVER\MSSQL\DATA\RAPOS_Replication_Log.ldf')  
    FOR ATTACH;

With sikuli, its some thing like below:

        type('CREATE DATABASE RAPOS_Replication')
        type(' ON (FILENAME = \'C:\Program Files\Microsoft SQL Server\MSSQL10_50.MSSQLSERVER\MSSQL\DATA\RAPOS_Replication.mdf\'),')
        type(' (FILENAME = \'C:\Program Files\Microsoft SQL Server\MSSQL10_50.MSSQLSERVER\MSSQL\DATA\RAPOS_Replication_Log.ldf\')')
        type('FOR ATTACH;'+Key.ENTER+Key.F5)
        wait(3)

Thursday, 29 March 2018

Special Train between Tambaram & Quilon


 தாம்பரம் - கொல்லம் - தாம்பரம் இடையே சிறப்பு ரயில். செங்கல்பட்டு, விழுப்புரம், திருச்சி, திண்டுக்கல், மதுரை, சிவகாசி, செங்கோட்டை வழியாக இயக்கம். 30ம் தேதி முதல் தாம்பரத்தில் இருந்து, 31ம் தேதி முதல் கொல்லத்தில் இருந்தும் சிறப்பு ரயில் சேவை.


Wednesday, 12 July 2017

Restoring Connections Tab in IE /Chrome

Some times system administrators may disable the Connections tab from IE. or some malware / viruses will do the same. If you want to restore the connections tab to revisit your proxy settings and dial up settings, you can do the following.

Make sure you have Administrator rights or Super user to edit Registry settings.

Open the run (Start --> run) and type regedit.exe
now go to the following key /folder in registry:
Value Name: ConnectionsTab
Key 1: HKEY_CURRENT_USER\Software\Policies\Microsoft\Internet Explorer\Control Panel
Key 2: HKEY_LOCAL_MACHINE\Software\Policies\Microsoft\Internet Explorer\Control Panel
Just open the registry editor go to those keys and delete the value if it exists.

If you see a value as 1 please change it to 0 and close the registry. Now open IE, you can able to see the connection tab in Internet Options.

Friday, 23 June 2017

Configuring Fiddler with Browser, .Net based & Java based Applications

Configure an application to use Fiddler

Fiddler is an HTTP Proxy running on port 8888 on your local PC.  You can configure any application which accepts a HTTP Proxy to run through Fiddler so you can debug its traffic.
WinINET-based applications (E.g. Microsoft Office, Internet Explorer, etc) should automatically use Fiddler while it's running and the "Capture Traffic" box is checked on the Fiddler File menu.
If they do not, they can be configured to use Fiddler by setting the appropriate option in the Internet Explorer Tools | Internet Options | Connections | LAN Settings dialog.  (You can also get to this dialog in the Tools | Internet Options menu inside Fiddler). 

Monitor RAS, VPN, or dialup connections

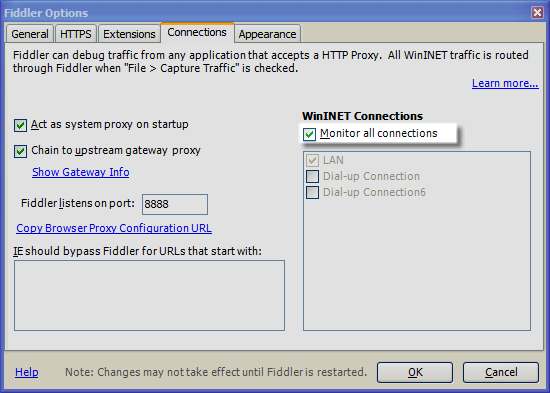
Fiddler 2.2.0.3 and later introduces a new option which enables automatic monitoring of dialup or VPN connections:
Monitor All Connections Option
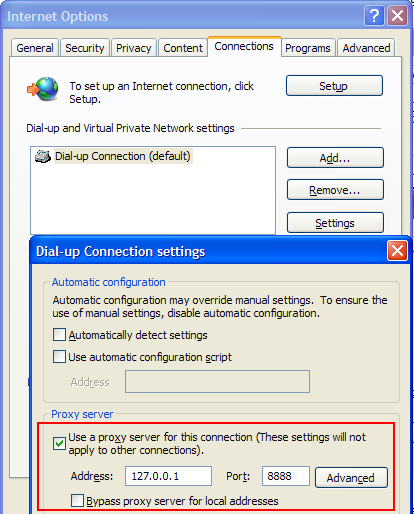
Otherwise, you'll need to set the Proxy Configuration manually. Set the proxy for your VPN/dialup connection as follows:
     Dialup Settings UI
Alternatively, you can set the "Use automatic configuration script" option as described in the "Other browsers" tip below.
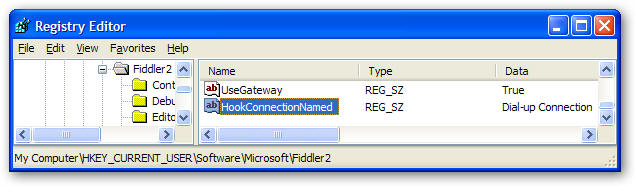
Note: If you always have an active VPN or dialup connection, set the HookConnectionNamed registry value to the name of the Connection (e.g. "Dial-up Connection" in the above screenshot).  When you do this, Fiddler will hook this connection instead of the LAN connection.
Registry Editor screenshot
Note: IE will always use the proxy settings from any active VPN connection, without regard to whether or not that VPN connects to the Internet. 

Configure a .NET application to use Fiddler?


If you're coding a .NET application, K Scott Allen's blog shows a simple way to hook Fiddler temporarily for debugging purposes:

GlobalProxySelection.Select = new WebProxy("127.0.0.1", 8888);
Note that you might not even need to do this-- The Framework should autodetect the WinINET proxy when the .NET application starts.  Note that this means that Fiddler must be started BEFORE your application if your application is to autodetect Fiddler.
You may specify a proxy inside the yourappname.exe.config file. If the .NET application is running in your current user account, you can simply add the following content inside the configuration section:
<configuration>
  <
system.net>
    <
defaultProxy>
      <
proxy bypassonlocal="false" usesystemdefault="true" />
    </
defaultProxy>
  </
system.net>
</configuration>
See http://msdn.microsoft.com/en-us/magazine/cc300743.aspx for more on this topic.
If you need to get code running in a different user-account (e.g. a Windows Service) to send traffic to Fiddler, you will need to edit the configuration inside the machine.config.
<!-- The following section is to force use of Fiddler for all applications, including those running in service accounts -->  <system.net>
  <
defaultProxy>
    <
proxy autoDetect="false" bypassonlocal="false" proxyaddress="http://127.0.0.1:8888" usesystemdefault="false" />
  </
defaultProxy>
</
system.net>
If all else fails, you can manually specify the proxy on an individual WebRequest object, like so:
objRequest = (HttpWebRequest)WebRequest.Create(url);
objRequest.Proxy= new WebProxy("127.0.0.1", 8888);
Important: Regardless of other settings, .NET will always bypass the Fiddler proxy for URLs containing localhost.  So, rather than using localhost, change your code to refer to the machine name.  For instance:
Does not show in Fiddler: http://localhost/X509SignCodeService/X509SigningService.asmx

Shows in Fiddler: http://mymachine/X509SignCodeService/X509SigningService.asmx

Configure a PHP/CURL application to use Fiddler?

Add the following line of code before you send your requests, where $ch is the handle returned by curl_init():
curl_setopt($ch, CURLOPT_PROXY, '127.0.0.1:8888');
From the command line:
curl --proxy 127.0.0.1:8888

Configure a Java application to use Fiddler?

Per http://www.davidreilly.com/java/java_network_programming/#2.4 you should be able to do something like:
jre -DproxySet=true -DproxyHost=127.0.0.1 -DproxyPort=8888 MyApp
But, per http://stackoverflow.com/questions/120797/how-do-i-set-the-proxy-to-be-used-by-the-jvm, you instead need to use:
jre -DproxySet=true -Dhttp.proxyHost=127.0.0.1 -Dhttp.proxyPort=8888
You can also change the VM's proxy settings programmatically:
System.setProperty("http.proxyHost", "127.0.0.1");
System.setProperty("https.proxyHost", "127.0.0.1");
System.setProperty("http.proxyPort", "8888");
System.setProperty("https.proxyPort", "8888");
You can learn more here: http://java.sun.com/j2se/1.5.0/docs/guide/net/proxies.html. 

Why don't I see traffic sent to http://localhost or http://127.0.0.1?

Internet Explorer 8 and earlier and the .NET Framework 4.5 and earlier are hardcoded not to send requests for Localhost through any proxies, and as a proxy, Fiddler will not receive such traffic.
Update: This behavior was changed for Internet Explorer 9. IE9 allows Fiddler to proxy traffic sent to localhost or 127.0.0.1 without additional steps on your part.
The simplest workaround is to use your machine name as the hostname instead of Localhost or 127.0.0.1. So, for instance, rather than hitting http://localhost:8081/mytestpage.aspx, instead visit http://machinename:8081/mytestpage.aspx.
...Or, just use http://ipv4.fiddler to hit localhost on the IPv4 adapter. This works especially well with the Visual Studio test webserver (codename: Cassini) because the test server only listens on the IPv4 loopback adapter. Use http://ipv6.fiddler to hit localhost on the IPv6 adapter, or use http://localhost.fiddler to hit localhost using "localhost" in the Host header. This last option should work best with IIS Express.
Lastly, you could update your Rules file like so:
static function OnBeforeRequest(oSession:Fiddler.Session){
  
  if
 (oSession.HostnameIs("MYAPP")) { oSession.host = "127.0.0.1:8081"; }
}
...and then just hit http://myapp, which will act as an alias for 127.0.0.1:8081.
Note: You shouldn't ever encounter the "Localhost traffic not captured" problem with Firefox. The FiddlerHook add-on for Firefox removes "localhost" from the "bypass proxy" list when Fiddler is in "Capturing" mode.

Configure a WinHTTP application to use Fiddler?

You can either directly configure the WinHTTP application to point to Fiddler, in code, or you can use the following command at the command prompt to tell WinHTTP to use Fiddler:
On XP or below:
proxycfg -p http=127.0.0.1:8888;https=127.0.0.1:8888
...or this one to force WinHTTP to use WinINET's proxy settings:
proxycfg -u
On Vista or above, use an Elevated (admin) command prompt:

netsh winhttp set proxy 127.0.0.1:8888
Note: On Windows 7 and earlier, netsh is bitness specific, so you may want to run the above command twice: first using the 32bit NETSH and then using the 64bit NETSH. This blog has more information. This issue was fixed in Windows 8; you can call either NetSh just once to set the proxy for both 32bit and 64bit WinHTTP hosts.

Capture traffic from a different account, like ASP.NET on IIS or from a Windows Service?

Trying to capture SOAP calls coming from ASP.NET or some background service process?
 By default, Fiddler registers as the proxy only for the current user account (ASP.NET runs in a different user account). To get a background process (like the ASP.NET or IIS process) to use Fiddler, you must configure that process to use Fiddler.

Typically, this is done by editing web.config or machine.config for the ASP.NET installation, or the configuration for the code running within the Windows Service.
Please see http://msdn.microsoft.com/en-us/magazine/cc300743.aspx#S4 or the section on .NET or WinHTTP, depending on which network stack the service is using.

Configure Windows Phone 7 to use Fiddler?

Please see http://blogs.msdn.com/b/fiddler/archive/2011/01/09/debugging-windows-phone-7-device-traffic-with-fiddler.aspx for actual device hardware, orhttp://blogs.msdn.com/b/fiddler/archive/2010/10/15/fiddler-and-the-windows-phone-emulator.aspx for the emulator.

Configure Google Nexus 7 (Andoid 4.1 Jellybean) to use Fiddler?

Please see this page.

Configure Android Emulator to use Fiddler?

Please see http://aurirahimzadeh.spaces.live.com/blog/cns!F5CF78DEA3328162!3717.entry. I've heard rumors that the Android emulator was broken at some point, I'm afraid I don't have details and you'll need to talk to Google about it.

Configure IEMobile on PocketPC to use Fiddler

Yes.  This works over desktop-passthrough (ActiveSync connection).

On the device, set the HTTP proxy to be ppp_peer:8888
On your desktop, open port 8888 in Windows Firewall (Control Panel) 
ActiveSync->Connection Settings... This Computer is connected to: Work Network
(Automatic will clobber the setting you did from #1) 
Start Fiddler as you normally would 
Tools->Fiddler Options... check "Allow remote clients to connect" (Restart Fiddler)
Connect your device to ActiveSync, fire up IEMobile and browse away...

Debug traffic on a Mac

This topic, including screenshots, is covered in the Fiddler Book.
As a Windows Application, Fiddler cannot run on Mac OSX natively.
However, virtualization products like VMWare Fusion or Parallels Desktop permit you to run Windows applications like Fiddler in a virtual machine on your Mac.
To run Fiddler under Parallels, only minor configuration changes are needed. Install Parallels and reconfigure the Windows Virtual Machine's Hardware > Network 1 Type setting to use Bridged Network mode.
This configuration will enable your Mac to send network traffic into the Virtual Machine. Restart the Virtual Machine and install Fiddler. To configure Fiddler, click Tools > Fiddler Options > Connections and check the box labeled Allow remote computers to connect. You will need to restart Fiddler for the change to take effect, and you may need to reconfigure your firewall to allow incoming connections to the Fiddler process. These steps allow Fiddler to accept connections from the Mac environment. Now, you must manually configure your Mac to direct its web traffic through Fiddler running in your Virtual Machine.
First, you must learn the IP address of the virtual machine. To do so, hover over the Online indicator at the far right of the Fiddler toolbar. A tooltip will show you the IP addresses assigned to the virtual machine.

Next, click the Apple Menu and click System Preferences. Click the Network icon and click the Advanced button. Click the Proxies tab. Enable the Web Proxy (HTTP) and Secure Web Proxy (HTTPS) options to point to the IPv4 address of the virtual machine; also specify that the proxy runs on port 8888.
After configuring the Mac's proxy, Fiddler will begin capturing traffic from Safari and other applications. When you're done using Fiddler, return to the OSX System Preferences and disable the proxy settings.

Debug traffic from another machine (even a device or Unix box)

You can capture traffic from any machine that supports a proxy, even if that machine isn't running Windows.  

1. Start Fiddler on a Windows machine named, for example, WINBOX1.
2. In Fiddler, click to make sure Tools / Fiddler Options / Allow remote clients to connect is checked. 
(Restart Fiddler if this box wasn't already checked.)
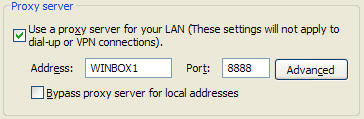
3. On the other machine (Mac/Unix/Windows) set the proxy settings to WINBOX1:8888.
Internet Control Panel Proxy Server UI
The second machine will now send its traffic through Fiddler running on WINBOX1. 

If you want to decrypt HTTPS traffic, you may need to configure that second machine to trust the FiddlerRoot certificate.

Configure other browsers to use Fiddler


Fiddler is compatible with all known web browsers.
Current versions of Internet Explorer, Google Chrome, Apple Safari, and Opera all automatically use Fiddler when Fiddler is configured to Capture Traffic.  (Opera requires that you start Fiddler before starting Opera).
Firefox is the only browser which does not use the System Proxy settings by default (prior to Firefox 10), and requires a little bit of extra configuration. Firefox 4+ can be configured to use the system proxy. In Firefox, click Tools > Options > Advanced > Network > Settings > Use System Proxy Settings (alternatively, see FiddlerHook Help.) Firefox is also one of only a handful of browsers that does not respect the Windows Certificate list. See this page for help on getting Firefox to trust Fiddler's HTTPS certificate.
Manual Configuration
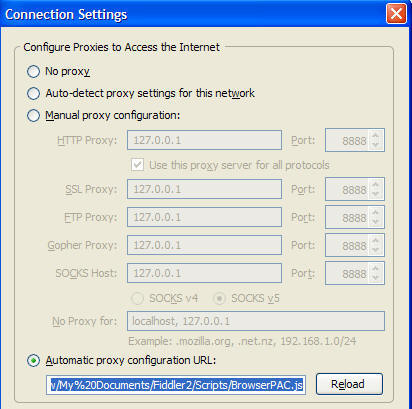
Every browser allows you to connect a proxy server; usually this is the Options (or Preferences) menu.  You can either point directly at Fiddler (address: 127.0.0.1, port: 8888), or you can use Proxy Auto-configuration. The advantage of auto-configuration is that Fiddler rewrites the configuration script when it is attached and detached, meaning you shouldn't need to manually enable or disable the proxy in your client depending on whether or not Fiddler is loaded.  Simply restart the browser and the new setting is detected.
For instance, if you don't want to let FiddlerHook do the job for you, you can manually configure Firefox to point at Fiddler. In Firefox, click Tools / Options / Advanced / Network / Settings, and adjust the settings like so:
Firefox proxy autoconfig UI
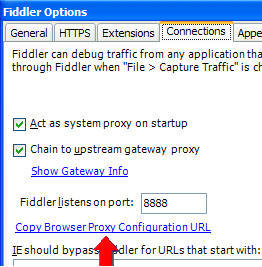
You can get the correct auto-configuration URL from Fiddler by clicking Tools / Fiddler Options / Connections, and clicking the "Copy Browser Proxy Configuration URL" link.
Copy Configuration URL UI

Can Fiddler "chain" to an upstream proxy?

Yes, all current versions of Fiddler support chaining to upstream proxies (either autodetected or manually specified).
So, you end up with an architecture like so: 
Fiddler proxy chaining diagram
Note that Fiddler does not support upstream proxy configuration scripts that are accessed using the FILE:// protocol, only those accessed using the HTTP or HTTPS protocols (so far, no one seems to have hit this limitation in the last 6 years).

To see what proxy Fiddler will chain to by default:

  1. Close Fiddler.
  2. Inside IE, choose Tools | Internet Options | Connections.
  3. Click the "LAN Settings" button.
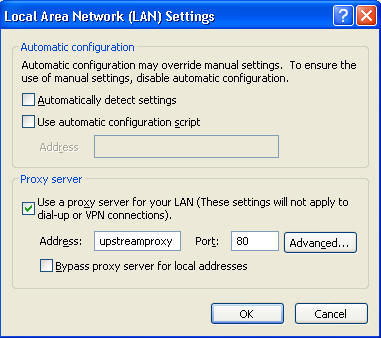
  4. On the dialog, examine the options:
    Internet Explorer proxy configuration UI
  5. After you restart Fiddler, choose Help | About Fiddler. 
  6. You should see the upstream proxy listed in the About box.

Redirecting to Another Host by Fiddler

If you want to redirect the request to one host to another host through fiddler, you can do it easily with Fiddler script. You can either edit the fiddler script by installing Fiddler script add on to fiddler or you can edit with notepad or similar text editors.

Open the fiddler script and locate this function :
static function OnBeforeRequest(oSession: Session) {

On this function paste the below code:
1
2
3
if (oSession.HostnameIs("yahoo.com")) {
oSession.hostname="google.com";
}
THis code will redirect the request from yahoo.com to Google.com. 

This will be helpful if you are testing applications in multiple domains.

Sunday, 9 April 2017

Editing Automatic server selection in CISCO ANYCONNECT VPN Client

hese steps are best used for when the default server is not vpn.cites.illinois.edu upon start up.Windows:

1.  Log in to the VPN normally
2.  Open a Windows Explorer window.

3.  Copy this file path: "C:\Users\%username%\AppData\Local\Cisco\Cisco AnyConnect Secure Mobility Client" (highlight all of the text between the double quotes, and then copy)

4.  Paste the copied path into the Address Bar in Windows Explorer.

5.  Press Enter.

6.  Right-click the preferences.xml file and select Edit

7.  Edit the Default Host Name line (by default, this line reads "<DefaultHostName></DefaultHostName>") or Edit EnableAutomaticServerSelection to false

8.  Click File > Save.

9.  Quit the VPN client by right-clicking the Cisco AnyConnect icon in the system tray (left of the clock) and select Quit.

10. Re-open the Cisco AnyConnect client by selecting it from the Start Menu

11. vpn.cites.illinois.edu should automatically populate in the text box.

Optional: In step 7, you can also edit the Default User line to include your username by adding the following: <DefaultUser>netid</DefaultHostName>

Shrinking the size of Oracle Virtual Box

First, zero fill your virtual disk. Boot the VM and run: sudo dd if=/dev/zero of=/bigemptyfile bs=4096k status=progress sudo rm -f /bigempty...